Series 7 Options Cheat Sheet: Calls, Puts & Spreads Formulas | Knopman Marks
Filed in: Exam Content, Exam Prep, FINRA Exam, Series 7, Study Tips

Series 7 options questions require pattern recognition rather than rote memorization. This cheat sheet provides the essential formulas for calls, puts, spreads, and straddles, helping candidates identify positions quickly and calculate max gain, max loss, and breakeven points with accuracy on exam day.
The goal isn’t to memorize dozens of formulas but to recognize the strategy in front of you. Once you do that, the math becomes much easier to remember, and much easier to apply.
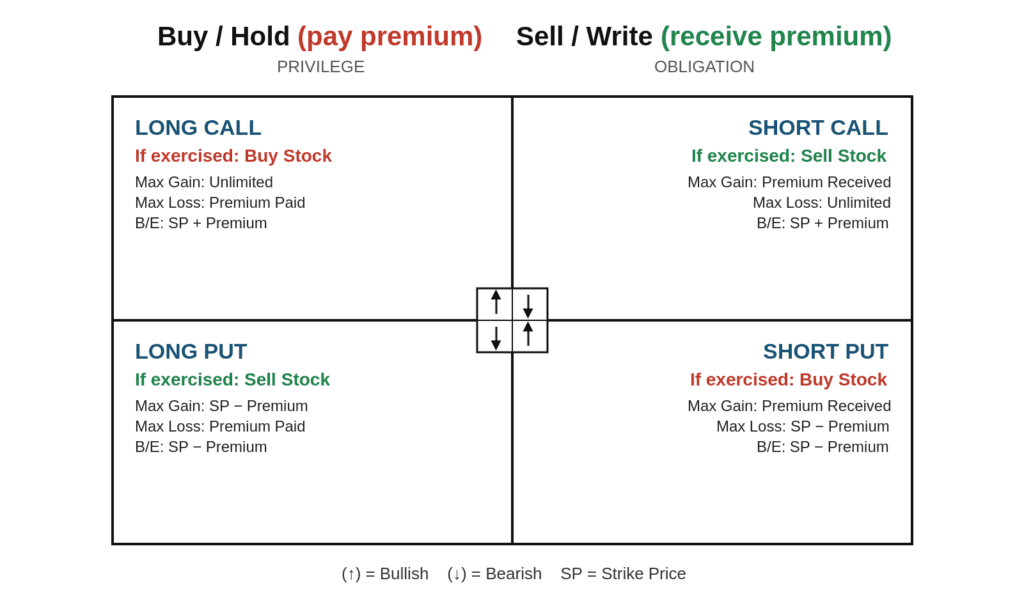
Options Basics: Single Contracts. Privilege vs. obligation, the equivalent stock position, and the max gain/loss/breakeven for each single option, at a glance.
The Three Numbers Every Options Question Asks
Most Series 7 options questions ultimately ask you to identify one (or more) of three values:
- Maximum Gain
- Maximum Loss
- Breakeven
The biggest mistake candidates make is reaching for a formula before they’ve identified the strategy.
Flip that process. Figure out what you’re looking at first: a long or short position, a debit or credit spread, or a straddle. Once you’ve identified the strategy, the formulas become much more predictable..
Single Options
| Position | Max Gain | Max Loss | Breakeven |
| Long Call | Unlimited | Premium Paid | Strike + Premium |
| Short (Naked) Call | Premium Received | Unlimited | Strike + Premium |
| Long Put | Strike − Premium | Premium Paid | Strike − Premium |
| Short Put | Premium Received | Strike − Premium | Strike − Premium |
| Covered Call | (Strike − Stock Cost) + Premium | Stock Cost − Premium | Stock Cost − Premium |
| Protective Put | Unlimited | (Stock Cost − Strike) + Premium | Stock Cost + Premium |
| Covered Put | (Stock Cost − Strike) + Premium | Unlimited | Stock Cost + Premium |
| Protective Call (Married Call) | Stock Cost − Premium | (Strike − Stock Cost) + Premium | Stock Cost − Premium |
Yellow highlights mean max gain = breakeven (Long Put, Protective Call). Blue highlights mean max loss = breakeven (Short Put, Covered Call), one less formula to memorize in each case.
One more pattern worth noticing: for every covered and hedge position (the bottom four rows), the breakeven is built around Stock Cost, not the strike. That’s because once stock is part of the position, the stock is the most important piece of the trade. It’s what you’re protecting or covering, and it’s what breakeven measures from.
That also makes the two hedge strategies (Protective Put and Protective Call) easy to reason through: think of them like insurance. You buy the option in the direction you’re afraid the market will move: worried your long stock will fall, you buy a put; worried your short stock will rise, you buy a call. Either way, the premium is the cost of the policy.
Quick Pattern
Here’s one shortcut that saves candidates a surprising amount of time:
- Buyers pay the premium, so buyers have limited risk.
- Sellers collect the premium, so sellers accept the greater risk.
When you’re stuck, start there. It often points you toward the correct formula before you ever begin calculating.
Debit and Credit Spreads
A spread combines two option positions, but the first question is always the same:
Is it a debit spread or a credit spread?
Think of it this way:
- Debit = you’re paying to get in. You want the spread to widen.
- Credit = you’re getting paid to get in. You want the spread to narrow or expire.
On the exam, these terms get used interchangeably, so get comfortable with all of them: Debit = Buy = Long, and Credit = Short = Sell. A question might say “buy” instead of “debit,” or “short” instead of “credit.” They mean the same thing.
That swap is also the fastest way to read a spread’s directional bias. Just substitute “buy” for “debit” and think about what that position alone would mean. A Debit Put Spread is like buying a put, which is bearish. The same logic runs through all four spreads: a Debit Call Spread is bullish (buying a call), a Credit Call Spread is bearish (selling a call), and a Credit Put Spread is bullish (selling a put).
| Spread | Max Gain | Max Loss | Breakeven |
| Debit Call Spread (Bull) | Difference in Strikes − Net Debit | Net Debit | Lower Strike + Net Debit |
| Debit Put Spread (Bear) | Difference in Strikes − Net Debit | Net Debit | Higher Strike − Net Debit |
| Credit Call Spread (Bear) | Net Credit | Difference in Strikes − Net Credit | Lower Strike + Net Credit |
| Credit Put Spread (Bull) | Net Credit | Difference in Strikes − Net Credit | Higher Strike − Net Credit |
Orange cells share the “Difference in Strikes − Net Premium” formula; green cells are just the plain net premium. Every spread has one of each, whichever side isn’t capped by the strike spread.
Shortcut: Spread Breakevens
Rather than memorizing four separate formulas, remember one simple pattern.
| Mnemonic | Formula | |
| Call spreads | Call LA | Lower Strike + Add Net Premium |
| Put spreads | Put the kids in HS | Higher Strike − Subtract Net Premium |
Once you’ve identified the spread correctly, the breakeven calculation usually follows naturally.
Knopman Marks Tip: Identify the Spread Before You Calculate
Before you even get to max gain, max loss, or breakeven, identify three things about the spread in front of you:
1. Type. Is it built from calls or puts?
2. Vertical, horizontal, or diagonal. Does the strike change, the expiration change, or both?
3. Debit or credit. Did you pay or collect money to put the trade on? This is the most important of the three, since it tells you which direction you want the position to move. A quick way to check: look at the dominant leg, if it’s the one you bought (long), it’s a debit; if it’s the one you sold (short), it’s a credit.
Here’s how to sort out factor #2:
Vertical, same expiration, different strike price.
Horizontal (calendar), same strike price, different expiration.
Diagonal, both the strike and the expiration are different.
Once you’ve placed the spread in one of those three buckets, a simple memory hack tells you which way you want the position to move:
A quick way to lock that in: count the letters.
| DEBIT = WIDEN (5 letters each) CREDIT = NARROW (6 letters each) |
That same debit/credit label also tells you what you want to happen at expiration. With a debit spread, you paid to get in, so you want to get in the game and exercise the contract to make money. With a credit spread, you’re already ahead. You collected the premium up front, so you want the contract to expire so you keep the money.
Straddles
| Position | Max Gain | Max Loss | Breakevens |
| Long Straddle | Unlimited (Upside) | Total Premiums Paid | Strike ± Total Premiums |
| Short Straddle | Total Premiums Received | Unlimited | Strike ± Total Premiums |
Unlike most strategies, straddles have two breakeven points because they profit—or lose—from significant movement in either direction.
Notice that a straddle’s max gain and max loss follow the same logic as a single call: the call side drives the number. The one thing to watch: use the total premium, both premiums added together, not just the call’s premium alone.
Common Options Mistakes on the Series 7
Many candidates lose points on options not because the calculations are difficult, but because they start solving before they’ve identified the strategy.
Some of the most common mistakes include:
- Confusing buyers and sellers.
- Mixing up debit and credit spreads.
- Forgetting that long positions pay premiums while short positions receive them.
- Missing one of the two breakeven points on a straddle.
- Jumping into calculations before determining what position they’re actually looking at.
A few extra seconds spent identifying the strategy often saves far more time than rushing into the math.
Why Study Options with Knopman Marks?
Options require more than memorizing formulas. They require recognizing patterns, understanding how different strategies behave, and applying them under pressure.
That’s why Knopman Marks dedicates significant instructional time to options through the Series 7 Video Vault, faculty-led classes, benchmark exams, and premium study tools. Rather than simply teaching calculations, the curriculum is designed to help students recognize strategies quickly, understand why they work, and apply them with confidence on exam day.
Want to master these patterns under pressure? See how our Series 7 Course uses predictive analytics to identify your weak spots before exam day.
Final Thought
The strongest Series 7 candidates don’t memorize dozens of disconnected formulas. They learn to recognize patterns.
Once you can identify the strategy in front of you, the formulas become much easier to remember—and much easier to apply when it counts.
Written by Dave Meshkov
Dave's mission (and job: Managing Director of Course Design) is to make FINRA exam training engaging, approachable, and dare he even say, enjoyable. Having trained and coached over ten thousand students to exam success he knows how to present complex subjects in memorable and understandable ways. Prior to joining Knopman Marks in 2011, Dave practiced bankruptcy law at Weil, Gotshal & Manages and served as a law clerk in a the Southern District of New York Bankruptcy Court working on the General Motors and Lehman Brothers bankruptcies. Building on his legal expertise and training allows him to keep all our courses updated with the latest legislative and rule-making changes. Dave currently trains for the Securities Industry Essentials (SIE) exam and the Top-Off Series 6, 7, 24, 57, 63, 65, 66, 79, 86, 87, and 99 exams. He also delivers executive one-on-one training and shares his passion for learning outside of work as a ski instructor and yoga teacher. Dave graduated magna cum laude from Fordham Law School, and cum laude with a BA from the University of Pennsylvania.
Related posts
 Read more
Series 7 Passing Score: Are Your Benchmark Scores Enough?
One good benchmark score can be a relief. It can also be misleading. The Series 7 requires a scor
 Read more
How to Pass the Series 7 Exam: A Proven Study Plan
Most candidates need approximately 75–100 hours to prepare for the Series 7 exam. The most effect
 Read more
Is the Series 7 Harder Than the SIE? Core Differences Explained
Is the Series 7 Harder Than the SIE? Yes. The Series 7 is significantly harder than the Securitie